
Thank you so much for your interest in my work. The Bagrielle Snuggy was named after my middle sister, I promise it is filled with love and calmness. You can also follow this pattern through the video tutorial by clicking here for the first part, and here for the second part Please, note that this pattern is for personal use only. You may sell the finished product, but this pattern, or any parts of it, are not to be shared, translated, sold, published, reproduced as any form of tutorial (including video), or claimed as your own. Use the hashtag #Bagriellesnuggy to share your progress with me on instagram!
Merci beaucoup,
Alex la Terreur
ABBREVIATIONS
This pattern uses US terms.- Ch: Chain
- Sts: Stitch
- Slst: Slip stitch
- Blo: Back loop only
- Sc: Single crochet
- Mo: Moss Inc: Increase (put 2mo into the same space)
- Dec: Decrease (mo 2 stitches together)
- Fsc: Foundation single crochet
- WS/RS: Wrong side/Right side
MATERIAL
Size 6 yarn, I suggest bernat blanket or parfait chunky!- 7.00 mm hook for ribbing ;
- 8.00 mm hook for the body ;
- Sewing needle ;
- Stitch markers.
YARDAGE
I added an extra 100m. If you plan on making the snuggy longer, I highly suggest getting a little more to be sure!- XSmall-Small: 1100m
- Medium-Large: 1200m
- Xlarge-2XLarge: 1400m
- 3XLarge- 4XLarge: 1500m
- 5XLarge: 1600m
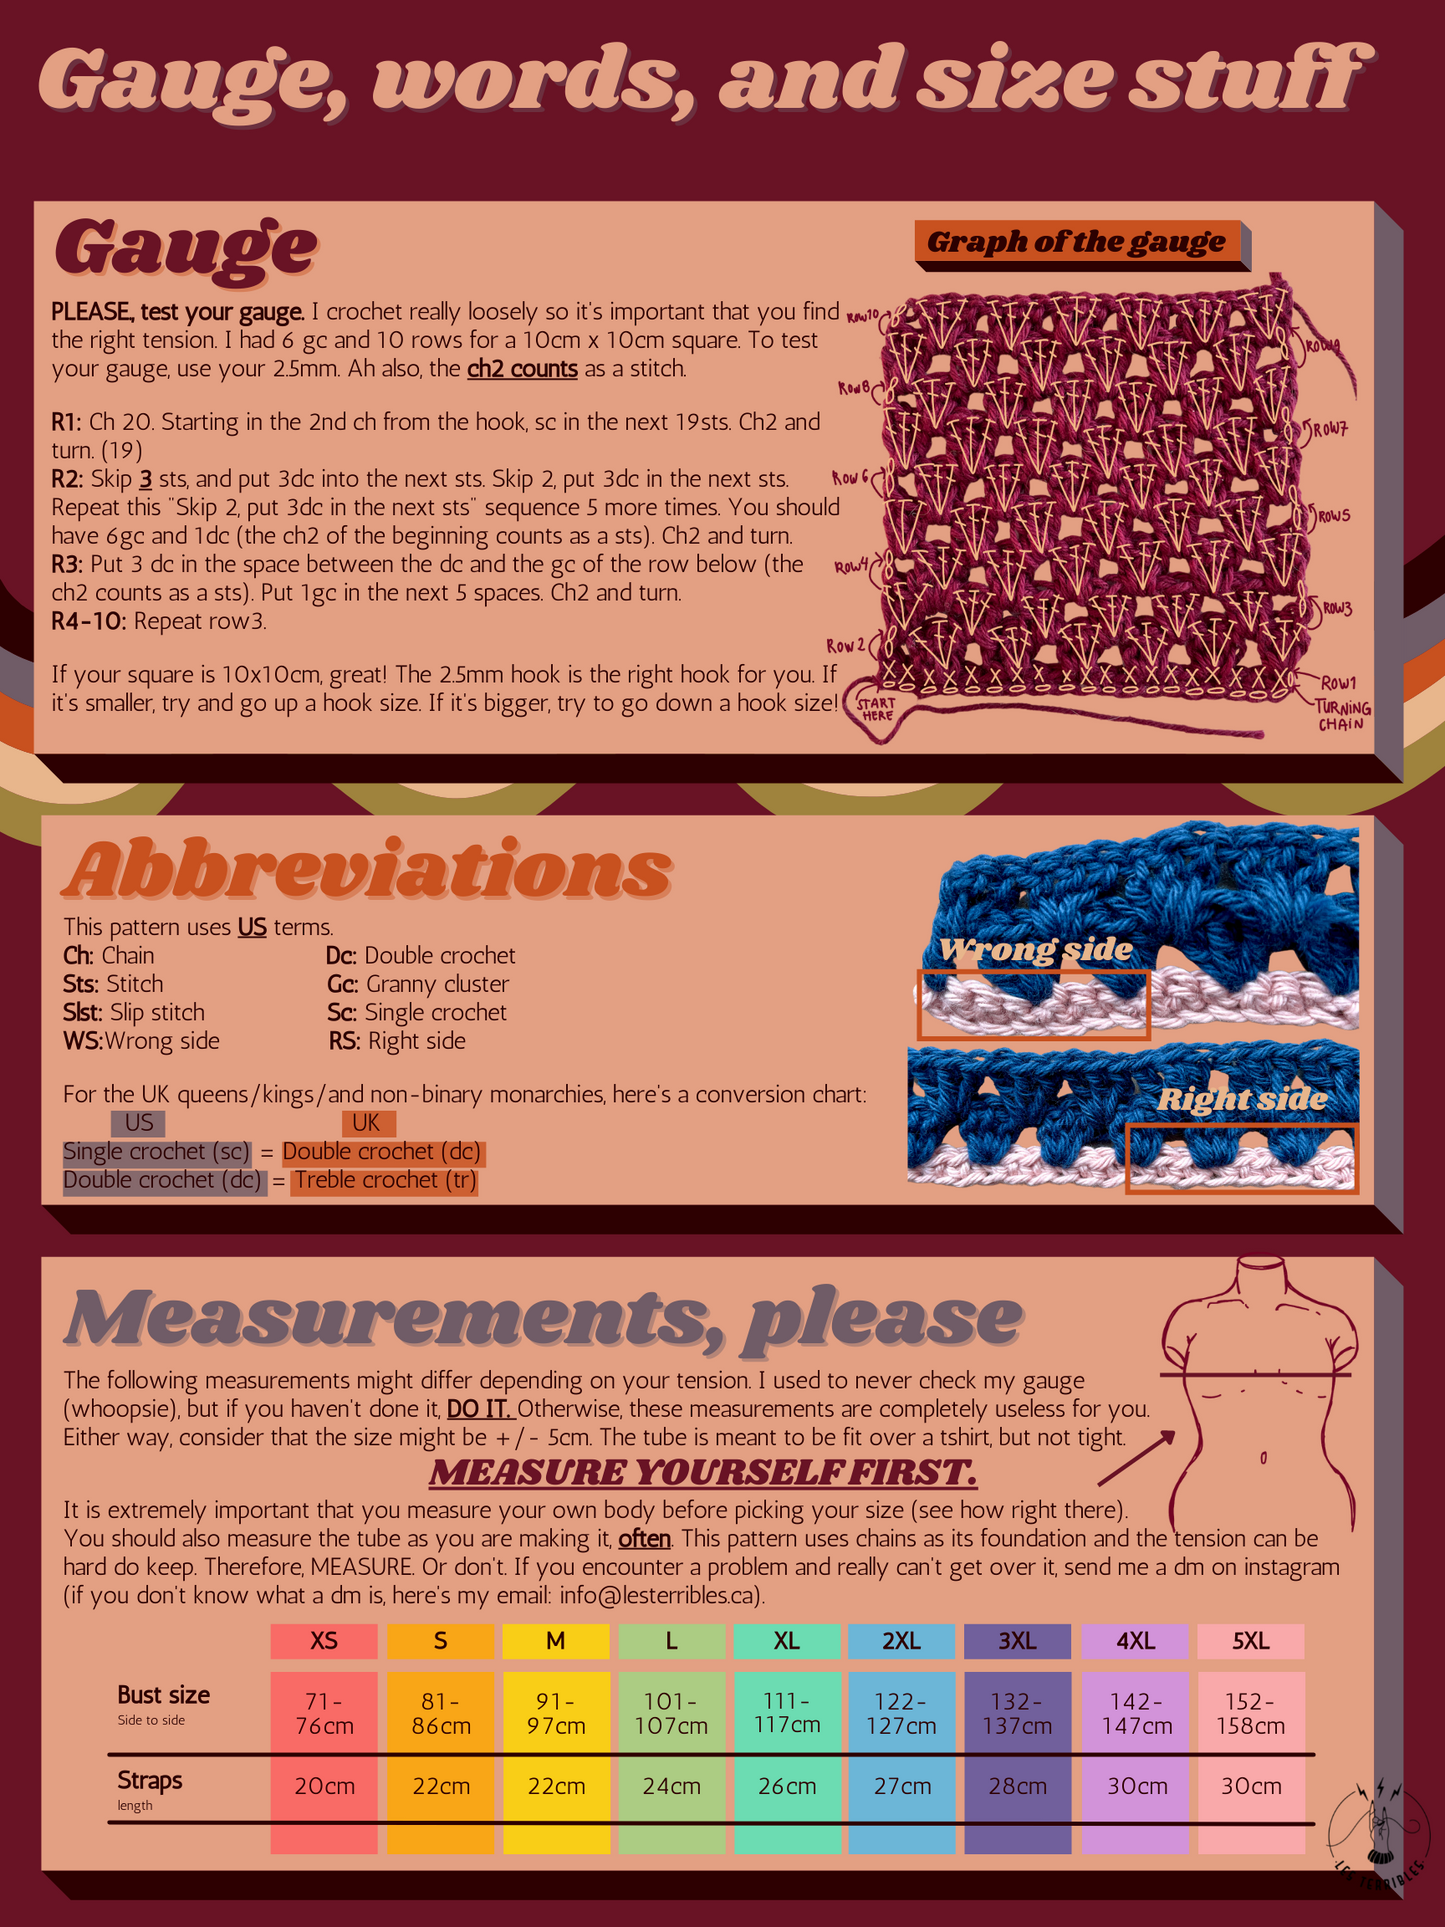
GAUGE

The gauge is a quick swatch to make sure that you have the same tension as me with the hook and yarn you're using. If it's off, the measurement won't be the same as the pattern suggest (this means it's useless to test it! So the gauge for this pattern is 5mo (sc, ch1 and skip the next stitch working in the ch1 space from the row below) per 7 rows. You should get a 10x10cm square. I understand that the foundation double crochet (fsc) might be hard if you have never done it before.Make sure that you check your tension often!
R1: Fsc10, do 5mo across.Ch1 (This ch is called the turning chain) and turn.
***Alternative for fdc: Ch11. Start in 2nd ch from hook and do 10 sc. Ch1 and turn.
R2: Skip the first sts. Do 5mo. Ch1 and turn. The last mo should be in the turning ch.
R3-7: repeat row 2. Ch1 and turn at every row.
SIZING
The following measurements might differ depending on your tension. I used to never check my gauge (whoopsie), but if you haven't done it, DO IT. Otherwise, these measurements are completely useless for you. Either way, consider that the size might be +/- 5cm. The snuggy is meant to be really loose with baggier sleeves. It is extremely important that you try the snuggy as you are making it, often. Especially when you get around the arm holes. You can easily adjust if it's too big or too tight. There's no measurements for the length as it is up to you (mine was 65cm long for reference). If you have any troubles or are confused for some reason, send me a dm on instagram or go to lesterribles.ca and send an owl my way (or an email, if you're old fashion).
| XS-S | M-L | XL-2XL | 3XL-4XL | 5XL | |
| Bust size (circumference) | 90cm | 112cm | 132cm | 152cm | 172cm |
| Arm hole | 42cm | 44cm | 46cm | 48cm | 50cm |
| Sleeve | 42cm | 42cm | 44cm | 44cm | 46cm |
DISCLAIMER
The body is made by working two (2) panels that we are going to join later on. There's no bottom ribbing so tension is key here. Measure the length AND width of the panels (often) to make sure that you're not crocheting tighter/looser as you go. Do not hesitate to check your gauge by measuring a 10x10cm square as you are making the snuggy. The moss stitch is not the tightest of all, but changing your tension will have a considerable impact on the finish look!
THE BODY BABY
The great thing with this pattern is that you can customize it. You like a mid-length? An underboob? A please-hide-my-butt snuggy? Just keep going with the rows love! Please consider that the longer you go, the more yarn you need. Anyhoo, there's no ribbing, so let's get started. With the bigger hook (8mm):

Back panel first
R1: Ch 46 (56, 66, 76, 86). Ch 1 & turn.
R2: 23mo (28, 33, 38, 43). Ch 1 & turn. Repeat row 2 until you are satisfied with the length. I did 50 rows.
Next, the front panel:
The front panel is the same than the back, but you need to stop 10 rows before the end. For example, if you did 50 rows for the back panel, you should stop at the 40th row (we need to make a panel split). With the bigger hook (8mm):
R1: Ch 46 (56, 66, 76, 86). Ch 1 & turn.
R2: 23mo (28, 33, 38, 43). Ch 1 & turn. Repeat row 2 until you have 10 rows left to make. Don't fasten off.
PANEL SPLIT
There's basically no shoulder extensions for this pattern, but it requires a little adjustment on the front panel.
Right panel split
R1: With the 8mm hook and the right side facing out, keep going with the moss stitch for half of the panel. You should do 12mo (14, 17, 19, 22).

Repeat row 1 another 9 times for a total of 10 rows. Fasten off.
Left panel split
R1: With the right side facing out, attach the yarn into the middle of the panel with a slst. Sc into the same space. Ch1. This counts as the first mo. Do another 11mo (13, 16, 18, 21) for a total of 12mo (14, 17, 19, 22). Ch1 and turn.
R2: 12mo (14, 17, 19, 22). Ch1 and turn.
Repeat row 2 another 8 times for a total of 10 rows. Fasten off.
ATTACHING THE SHOULDERS
SLEEVES
The sleeves are worked in round because if there's something more annoying than ribbing, it's sewing lol. Lay your work flat with the right side facing out. Put a sts marker into the sc were the panels were joined. From there to your right, count 22 rows (28, 32, 38, 42). Put a sts marker. Do the same thing on the other side (you should have 3 sts marker, one in the middle and one on each side). With your bigger hook (8mm), insert your hook in the first sts marker to your right. Remove the sts marker.

MAKING THE CUFFS
JOIN THE PANELS
Use the 7mm hook to join the panels by sc them together.
If you want a better looking bottom edge, you can. Lay your work flat with the right side facing out, the neck facing down and the back of the pullover on top. Use the bigger hook (8mm) and attach the yarn with a sc in the middle of the back. Sc around and close with an invisible finish.
HOOD